Scanning images for article publication
 Let's face it, philately is a visual hobby. As such, the quality of philatelic items (stamps, covers, and the like) reproduced in The Canadian Philatelist (i.e. images) is of extreme importance. An excellent article can be 'brought down' if poor images accompany it.
Here are guidelines we expect authors to follow when providing images for publication in The Canadian Philatelist
For any stamp or cover, please only use a scanner.
Only use a camera for 3D objects that cannot be scanned on a flatbed scanner.
The most important rule when scanning for publication purposes is to set your scanner for at least 300dpi scans. If details of a stamp are being provided then 600dpi, or higher, is required.
Many scanners (particularly the 'all-in-one' types) default to either 72, 100 or 200dpi. This quality is not sufficient for printing purposes!
Your scanner will likely refer to the quality of images as resolution. Unfortunately, each scanner uses different software so I cannot give specific guidelines on where to find this setting for your scanner ... but, it may be in a menu option such as "Settings" or "Properties".
Please place your stamps/covers directly on the surface of the scanner. That is, please remove any items from their mounts before scanning.
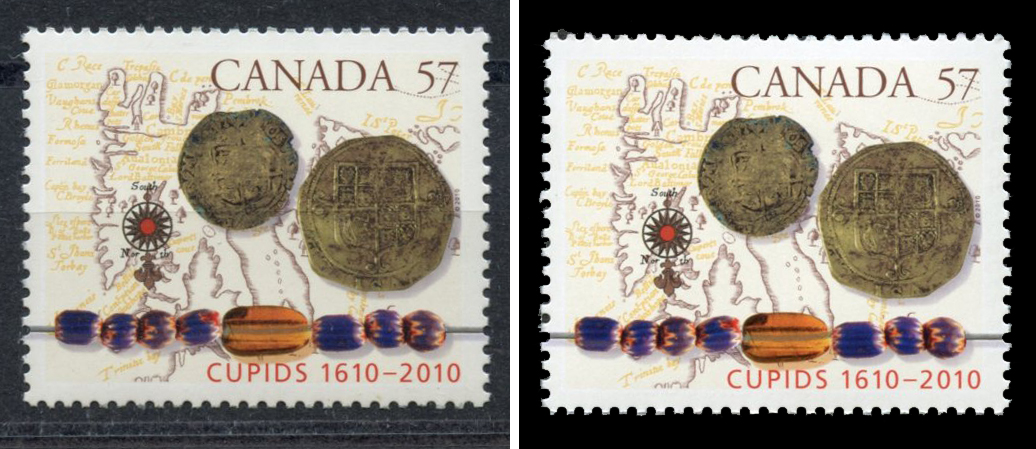
Take a look at the following image. The stamp on the left was kept in a two-row black stock card that also had clear plastic covering the entire card.

Notice that the overall 'brightness' of the image on the left is darker (grey-ish) because of the mount covering. Also notice (on the stamp on the left) the horizontal "line" at about the mid-point of the stamp ... this is due to the stamp being placed into a row of the stock card where the row mount only covers bottom half of the stamp.
The result of keeping the stamp in the mount is an image that is of poorer quality and shows a "line" across the scan which is not a part of the stamp. Very insightly
It does not matter if the stamp is a bit crooked on the scanner. It only takes seconds to crop and straighten a scan but it takes minutes (or longer) to "tweak" a poor scan (if at all)..
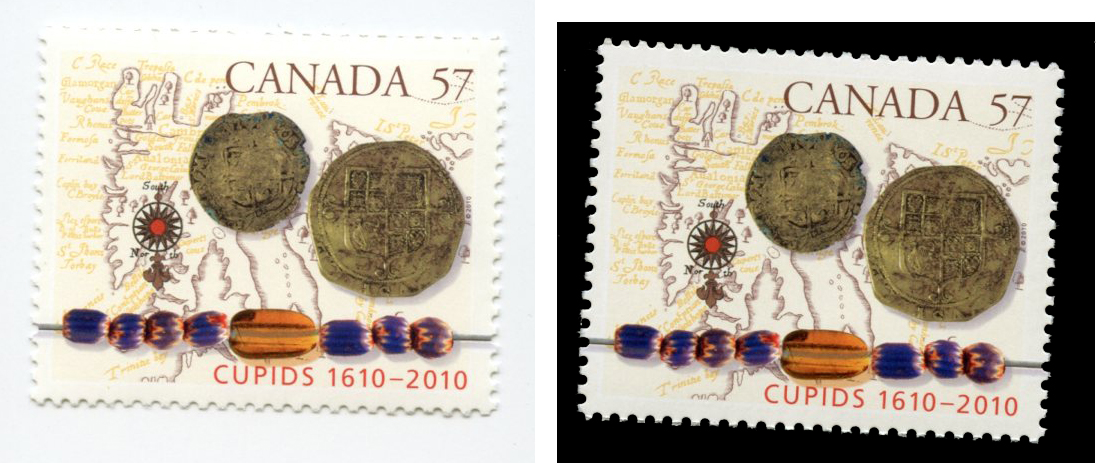
Scan with a black background. After you place your stamps/covers on the scanner (face down) you will likely need to place a black sheet of paper on top of the stamps before closing the scanner. Most scanners have a white lid.

Notice how the stamp with the black background shows up so much better when scanned with a black background.
There is no need to straigten, crop, or "tweak" your image in anyway ... I will do that on my end when editing and working with your article.
By the way, it should go without saying that one should clean the scanner glass before scanning! Any kind of lint (or other foreign substance) will show up on the final scans.
Please save your scanned images as JPG. The only other format that is suitable is TIFF. Do not save your scans in any other format.
When forwarding your scans to myself, please attach the scans as individual files to the e-mail; do not embed in a Word document or within the body of the e-mail.
Depending on the number images or the size of images, you may need to first "zip/compress" the scan(s) into a single file, or use a 3rd-party storage sight to transfer the files (such as WeTransfer or DropBox).
Please contact the editor directly if you have any questions regarding the above. E-mail.
Copyright 2001-22, 2023 The Royal Philatelic Society of Canada
All images and research articles found on this site are for your own personal pleasure and enjoyment only.
Any other use, particularly for a commercial nature on other web sites or auction listings is
strictly forbidden.